A gutter diagram is more than just a sketch, it’s a roadmap for protecting your home. By clearly showing each part of the gutter system and how they connect, these diagrams help homeowners, DIY installers, and contractors avoid costly mistakes. Whether you are planning a new installation, troubleshooting drainage issues, or learning the basics, a well-designed gutter system diagram makes the process easier, faster, and more reliable.
What is a Gutter Diagram?
A gutter diagram is a visual representation of how a gutter system is structured and installed. It typically shows all the essential parts such as channels, downspouts, hangers, and connectors along with how they fit together to guide rainwater away from a building.
The main purpose of a gutter diagram is to simplify complex installation steps and provide a clear view of each component’s placement. By mapping out slopes, angles, and connections, it ensures the gutter system is both functional and efficient.
Gutter diagrams are widely used by contractors, roofers, and homeowners. Professionals rely on them for accurate gutter installations, while DIY enthusiasts use them as a step-by-step guide to avoid mistakes and save time.
Components of a Gutter System
A gutter system is made up of several key parts, each working together to keep rainwater flowing safely away from your home. Understanding these components not only makes a gutter diagram easier to follow, but also helps you identify problems and carry out maintenance more effectively. Below are the essential elements typically shown in a gutter system diagram:
Gutter Channels
These are the horizontal sections fixed along the roofline. Their job is to catch rainwater running off the roof and direct it toward the downspouts. Channels come in various styles (K-style, half-round, seamless) and materials such as aluminum, vinyl, or steel.
Downspouts
Downspouts are the vertical pipes attached to the gutter channels. They carry collected rainwater from the roof down to the ground and away from the foundation. Without properly placed downspouts, water can pool near the house and cause damage.
Elbows and Connectors
Elbows are curved fittings used to change the direction of a downspout, while connectors join different gutter sections together. These parts help guide water around corners, ensuring smooth flow in tight or complex roof layouts.
Gutter Hangers/Brackets
Hangers or brackets provide structural support, securing the gutter channels to the fascia board. A well-placed set of hangers keeps the system sturdy and prevents sagging, especially under heavy rain or debris buildup.
End Caps
End caps close off the open ends of gutter channels to prevent water from spilling out. They are small but critical components that ensure the system functions properly without unnecessary leaks.
Splash Blocks & Extensions
Placed at the bottom of a downspout, splash blocks or extensions direct water further away from the home. They prevent soil erosion, flooding near the foundation, and water damage to landscaping.
Gutter Installation Diagram Explained
A gutter system may look simple from the outside, but when you take a closer look at a cross-section diagram, you can see how many parts work together to move water efficiently. Here’s a breakdown of each element in the illustration above:
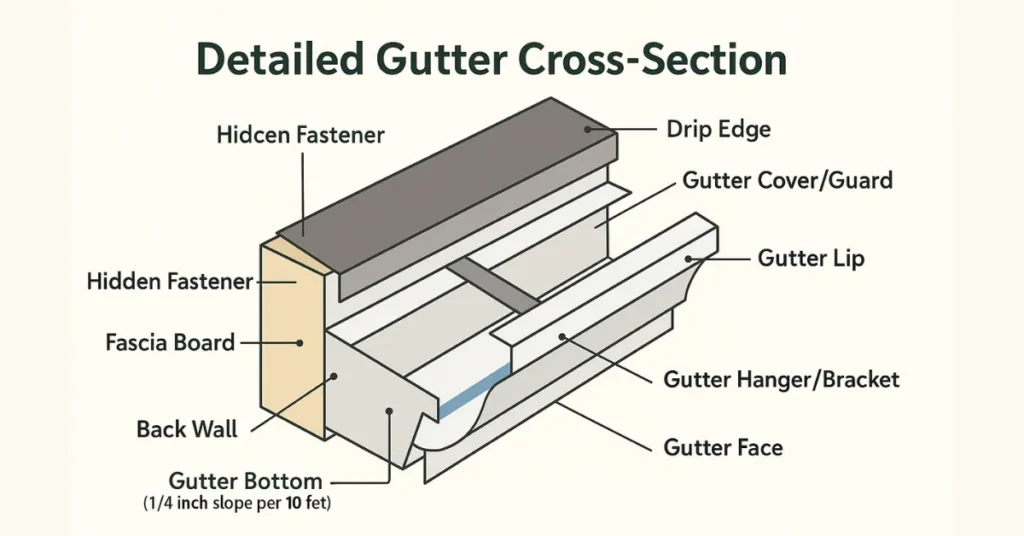
Drip Edge – Installed along the edge of the roof, the drip edge directs water straight into the gutter instead of letting it run behind the fascia board. This small detail prevents wood rot and structural damage.
Fascia Board and Back Wall – The fascia board is the horizontal strip of wood or metal mounted beneath the roof edge. The back wall of the gutter rests against it, providing a sturdy surface for attachment.
Hidden Fasteners – Instead of visible nails or spikes, modern systems use hidden fasteners and hangers. These not only secure the gutter to the fascia board but also provide even weight distribution, preventing sagging over time.
Gutter Channel:
- Face is the vertical front of the gutter that gives it shape and strength.
- Lip at the top edge helps control overflow and guides rainwater inside during heavy downpours.
- The bottom of the gutter is slightly sloped about ¼ inch every 10 feet to make sure water naturally flows toward the downspouts without pooling.
Gutter Cover/Guard – Positioned above the channel, this optional but highly recommended component blocks leaves, twigs, and debris from entering the system, reducing the need for frequent cleaning.
Each of these parts is carefully designed to work together. The drip edge controls entry, the channel collects and directs water, the slope ensures smooth flow, and the fasteners keep everything secure.
Types of Gutter Diagrams
Not all gutter diagrams are the same different projects require different levels of detail. Whether you are planning a home improvement, a new build, or just fixing a leak, there’s likely a diagram suited for the task. Below are the most common types you will come across:
Residential Gutter System Diagram
These diagrams are the most widely used by homeowners and roofers. They show standard components such as gutter channels, downspouts, elbows, hangers, and splash blocks. A residential gutter system diagram helps visualize how rainwater is collected from the roof and directed safely away from the home’s foundation.
Seamless Gutter Installation Diagram
Seamless gutters have become a popular choice because they are cut to exact lengths and reduce the risk of leaks. Diagrams for seamless installations usually highlight where the long continuous channels are mounted, how corners are joined, and where downspouts are placed. These guides emphasize precision and efficiency, since fewer joints mean fewer weak points.
Commercial Roof Drainage Diagram
Commercial properties often have bigger roofs and require more complex drainage solutions. A commercial roof drainage diagram typically includes multiple downspouts, oversized gutter channels, and sometimes interior drains. These diagrams are useful for architects and contractors to design systems that can handle heavy rainfall and large volumes of water.
Benefits of Using a Gutter System Diagram
A gutter system diagram isn’t just a technical drawingm it’s a practical tool that makes planning, installation, and maintenance easier. Here are the main advantages
Helps Visualize Layout Before Installation
A diagram gives homeowners and contractors a clear picture of how the gutter system will look once installed. It shows where each component fits channels, downspouts, elbows, and guards making it easier to plan ahead.
Reduces Installation Errors
By following a step-by-step illustration, installers can avoid common mistakes like improper slopes, misaligned joints, or misplaced downspouts. A gutter diagram acts as a checklist that keeps the installation accurate.
Saves Time and Cost on Adjustments
Without a diagram, trial-and-error installation can lead to wasted materials and labor. A properly detailed gutter installation diagram minimizes rework, saving both money and valuable time.
Provides a Clear Guide for Maintenance and Repairs
When issues like sagging, leaks, or clogs appear, a diagram helps pinpoint problem areas quickly. Homeowners can reference the layout to locate joints, fasteners, or sections that may need repair or replacement.
FAQs
Which gutter shape is best?
What is standard gutter size?
What is the rule of thumb for gutters?
What is the correct angle for guttering?
Conclusion
A well-drawn gutter diagram is more than just a sketch it’s a roadmap to a properly functioning drainage system. By clearly showing how components fit together, it helps homeowners, roofers, and contractors install gutters correctly, reduce errors, and maintain them with confidence. While diagrams make DIY projects easier, it’s always best to consult a professional gutter installer if the job feels complex or if your property has unique drainage needs. Properly planned gutters protect your home from water damage, save on costly repairs, and ensure peace of mind during heavy rainfall.